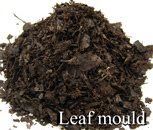
 As the garden changes mood with tones of russet, purple and gold, it does mean that leaves will shortly fall and adorn the ground. As much as I love autumn leaves I am not a fan of picking them up. However doing so then means I can make FREE soil conditioner by making leaf mold. With over 30 trees on our acre plenty of materials are at hand.
.
Leaf mould is the result of letting leaves sit and decompose over time. It comes out dark brown to black and has a pleasant earthy aroma and a crumbly texture, much like compost. In fact, leaf mold is just composted leaves.
You may be wondering why you shouldn’t just make compost. Why bother making a separate pile just for leaves? The answer is that while compost is wonderful for improving soil texture and fertility, leaf mould is far superior as a soil conditioner. It doesn’t provide much in the way of nutrition, so you will still need to add compost or other organic fertilizers to increase fertility. Leaf mold is essentially a soil conditioner. It increases the water retention of soils. According to some university studies, the addition of leaf mold increased water retention in soils by over 50%. Leaf mold also improves soil structure and provides a fantastic habitat for soil life, including earthworms and beneficial bacteria. So all in all great for organic gardening
There are two popular ways to make leaf mold, and both are ridiculously simple. The one thing you’ll need to keep in mind is that leaf mold doesn’t happen overnight. Leaves are basically all carbon, which takes a lot longer to break down than nitrogen-rich materials such as grass clippings. The decomposition process for leaves takes at least six to twelve months. The good news is that it’s basically six to twelve months with very little work on the gardener’s part.
To start with you need to collect up the leaves and you need a good leaf rake, gloves if you are handling them directly or use the very clever hand leaf grabs as seen below.

The first method of making leaf mold consists of either piling your leaves in a corner of the yard or into a wood or wire bin. The pile or bin should be at least three feet wide and tall. Pile up your leaves, and thoroughly dampen the entire pile. Let it sit, checking the moisture level occasionally during dry periods and adding water if necessary. This is the one we go for and have two piles one in the garden centre and one in our personal garden.
The second method of making leaf mold requires a large bin bag or jute leaf sack. We sell the cleverly named ‘Love em & Leaf em’ from Nether Wallop and all you have to do is fill the bag with leaves and moisten them. If you’re using the bin bag method, tie the bin bag and then cut some holes or slits in the bag for air flow. Let it sit.

After six months to a year, you will have finished leaf mold. Impatient? There are a couple of things you can do to speed up the process. Before adding leaves to your pile or bag, run over them a couple of times with your lawn mower. Smaller pieces will decompose more quickly.Use a shovel or garden fork to turn your leaf pile every few weeks. If you are using the bag method, just turn it over or give it a firm shake. This will introduce air into the process, which speeds decomposition.If you are using the pile or bin method, cover your pile with a plastic sheet. This will keep the leaves moist and warm.
Leaf mold has several uses in the garden. You can dig or fork it into garden beds to improve soil structure and water retention. You can use it as mulch in perennial beds or vegetable gardens. It’s also fabulous in containers, due to its water retaining abilities.
Leaf mold is simple, free, and effective.
So get raking and collecting.


Coincidence you should write this post today as noticed leaves on the lawn for the first time this afternoon and was thinking how we’ll be raking them up soon ourselves. You’ve reminded me to check the sacks of leaves I bagged up last year, thanks 🙂
Great to hear that you already make your own, but would have been surprised if you didn’t. Raking is also a great free garden gym workout.
It certainly is! And a great excuse to mess around with the children for a big frolickly leaf throwing session if it stays dry too 🙂
Pingback: Seven jobs for your autumn vegetable gardenGreenside Up
Pingback: 9 Winter Gardening Jobs You Can Do In Your KitchenGreenside Up